While I do have a love/hate relationship with spring, I must admit that when the sunshine comes out, it's absolutely beautiful and all of the spring colors and pastels are my favorite. I also love flowers and shamelessly wearing as much white as possible (while simultaneously struggling not to spill any red wine on my pants or let my dogs get any dirt on me).
I think the perfect way to get into the spring spirit is with this super easy spring recipe. I recently made these for two occasions 1) a bake sale for my job where we're currently raising money for our Relay for Life team to raise money for the American Cancer Society and 2) for my friend, Sarah, who was helping to host a bake sale for family whose house burnt down and two of the three daughters have Cystic Fibrosis, so of course I happily contributed to make some treats for these great causes.
Now, if you're anything like me, then Pinterest has failed you more than once. Even these didn't turn out how I wanted them to, but they still tasted good, and that's what counts.
INGREDIENTS
(I doubled this recipe so I could make each color stand out a little more, but you can just use this recipe and either use less colors, have the colors be in thinner lines or use a smaller pan - see below.)
3 tbsp. butter
1 package marshmallows
6 cups Rice Krispies cereal
Food coloring
Cooking spray
MATERIALS
A deep pot
Large spoon (I used a wooden spoon and sprayed with cooking spray)
Deep dish glass pan (I used a 13x9x2 pan, but if you don't double the recipe, I'd recommend using a square pan. Instead of cutting into squares, cut into strips.)
DIRECTIONS
1 | Melt the butter over low heat in a large pot
2 | Add the marshmallows
3 | Constantly stir while marshmallows melt
4 | After marshmallows have fully melted, add the cereal and remove from heat
5 | Stir until the the cereal and marshmallows are fully mixed
6 | Separate the mixture into four different bowls
7 | Use food coloring to make each bowl a different color. I did blue, yellow, pink, and green (yellow and blue)
8 | Grease your pan with either cooking spray or a stick of butter
9 | Spread each color in the pan, one layer at a time
10 | Let the treats full fully harden before cutting and serving (about an hour)

read more "
Cute & Easy Spring Rice Krispy Treats Recipe
"
Mardi Gras season is in full swing, and I couldn't be more excited. Louisiana food is always amazing, but during Mardi Gras, it's even better because king cake. I freaking love king cake, but most places in north Louisiana only serve it during Mardi Gras season. With this recipe, I can act like it's Mardi Gras season year-round.
INGREDIENTS
Filling
4 oz. cream cheese
1/2 cup light brown sugar
1/2 tsp. ground cinnamon
Cake
2 cans Pillsbury crescent rolls
Icing
1 1/2 cups powdered sugar
4 tbsp. 2% milk
1 tsp. pure vanilla extract
Food coloring
PREP
1// Preheat oven to 350°F
2// Mix together cream cheese, brown sugar, and cinnamon (if cream cheese is too hard, place in microwave on high for 15 seconds)
3// Place nonstick aluminum foil on a baking sheet
4// Unroll crescent rolls and separate triangles one-by-one. Overlap triangles about a quarter inch with points facing toward the center, forming an oval.
5// Spread the filling around the crescent roll toward the center of the triangles.
6// Optional: Place a small plastic baby randomly in the filling.
7// Fold the outside of each triangle toward the center all the way around the oval then pull the point end of each triangle toward the center, closing the gap.
8// Bake 18-23 minutes or until golden brown. Let cool to room temperature.
9// Mix the powered sugar, milk and vanilla extract until fully mixed.
10// Separate icing into three different bowls.
11// In one bowl, mix in green dye. In a second bowl, mix in yellow dye. In the third bowl, mix in red and blue dye to make purple.
12// Once the cake is cooled to room temperature, cover the cake with each color of icing.
13// Enjoy and celebrate the lovely Mardi Gras season. As per tradition, whoever gets the piece with the baby has to buy (or make!) the next king cake!
Have you ever celebrated Mardi Gras?
read more "
Super Easy & Delicious King Cake Recipe.
"
This is a sponsored campaign on behalf of POM and Millennial Blogs. All opinions are 100% mine.
When I was in middle school, we had something called a "Greek Mythology Day" where everyone in our grade was assigned a Greek god or goddess, and we had to come to school dressed up like them and give a short presentation about them in front of the whole grade. For Greek Mythology Day, I was assigned the goddess, Persephone, whose primary symbol is the pomegranate. Becoming Persephone for a day inspired me to try a pomegranate for the first time, and I loved it.
Flash forward to today, and pomegranates are still one of my favorite fruits and flavors, which is why I'm a huge fan of POM Wonderful. Drinking POM makes it easy for anyone to live a crazy healthy life on the go.
Today, I want to share a simple healthy recipe that's the perfect companion to a bottle of POM.
Frozen Vanilla, Strawberry and Pistachio Yogurt Bars
Ingredients:
2 cups vanilla Greek yogurt
4 tbsp. honey
1 5 oz. bag of pistachios, coarsely chopped (about 3/4 cup)
1 1/2 cup of strawberries, blended
Directions:
1// Mix the Greek yogurt and honey together
2// De-shell and chop (I put mine in my Ninja blender)
3// Blend all of the strawberries together (Again, I used my Ninja blender)
4// Mix the yogurt-honey mixture with the pistachios and strawberries
5// Put a piece of parchment paper in a long, glass pan
6// Pour the mixture onto the parchment paper
7// Place in freezer overnight
8// Cut into pieces or break apart like bark
To enjoy:
1// Take out of freezer and let thaw for 5 minutes
2// Pair it with a bottle of POM Wonderful
How do you live a crazy healthy lifestyle?
Share how you live a crazy healthy lifestyle using the hashtag #CrazyHealthy on Instagram, Twitter, or by uploading directly to the Facebook app and win some awesome prizes!
 Ready to get #CrazyHealthy? Save $0.50 on any 12 oz or larger POM Wonderful beverage.
read more "
Frozen Vanilla, Strawberry and Pistachio Yogurt Bars Recipe.
"
Warning: You may become obsessed with freezer meals after trying these recipes.
I know I'm not alone when I say that cooking every night can easily become a hassle. This is why I was attracted to the idea of freezer meals. It's so easy because you just take an hour one day to mix and prepare all your meals for the week (or longer) and then go on your merry way.
The freezer meals I'm sharing today are all ones that I found on Pinterest and slightly adapted for my own tastes or reduced to feed just two people. They're also all recipes for slow cooking in a crock pot all day, but you can always just defrost them and cook them in the oven for a reduced amount of time as well.
General Steps:
1. Gather all of your ingredients
2. Label your freezer bags with what the recipe is and how long to cook it in the crock pot
3. Mix ingredients in the freezer bag
4. Place freezer bag in the freezer
Recipes:
These five recipes will make six freezer meals. (Note that I made two of the pork chops freezer meal, but the ingredients listed are just for one meal). For your convenience, I've compiled the ingredients into a shopping list! I would recommend putting it in the refrigerator the night before to thaw so that it'll be ready in the morning to just throw into the crock pot.
GARLIC RANCH CHICKEN
- 3-4 pieces of chicken (thighs or breasts)
- 1 can cream of mushroom soup
- 2 packets ranch mix
- 3 cloves minced garlic
Cook on high for 3 hours.
(Note: This recipe is a bit salty, but I like salt, so I love it. If you're not big on salt, reduce the amount of ranch mix seasoning or add some milk before cooking.)
TERIYAKI CHICKEN
- 3-4 pieces of chicken (thighs or breasts)
- 1 cup teriyaki sauce
- 1 cup water
- 2/3 cup brown sugar
- 3 cloves garlic
Cook on low for 4-6 hours.
SWEET BBQ CHICKEN
- 4-6 pieces of chicken (thighs or breasts)
- 12 oz. BBQ sauce
- 1/2 cup brown sugar
- 1/4 cup vinegar
- 1 tsp. cayenne pepper
- 1 tsp. garlic powder
Cook on low for 4-6 hours.
CREAMY RANCH PORK CHOPS
(I made two freezer meals out of all the pork chops I bought)
- 4-6 thick-sliced pork chops
- 2 cans cream of mushroom soup
- 2 packets ranch mix
- 1 cup milk (don't put in freezer bag)
Cook on high 3-4 hours after adding 1 cup of milk to the mix.
LEMON PEPPER CHICKEN
- 4-6 pieces of chicken (thighs or breasts)
- Fresh lemon juice from 1 lemon (about 3 tbsp. - I just bought lemon juice, but it's up to you!)
- 1/2 tsp. black pepper
- 1/4 tsp. salt
Cook on low for 3-6 hours.
I'm seriously obsessed with freezer meals now. They're convenient, and the meat is always so tender and juicy. Not to mention, when I come home from work, the first thing I smell is the delicious aroma of an amazing meal that I didn't even have to slave over.
Have you ever tried freezer meals? What are some of your favorite freezer meal recipes?
read more "
Make 6 Freezer Meals in 60 Minutes (or Less).
"

Jon and I have been living together for almost two months now. Granted I was on vacation for almost 3 of those weeks, but I digress. We're steadily trying to get into a cooking routine, and we have tons of fun cooking together. Sometimes, we like to try more complicated recipes, but most of the time, we like to keep it relatively simple.
While Jon tends to like almost everything he eats, I'm a more picky eater. One thing that we can always agree upon is pizza (though preferred toppings are usually up in the air). The other day, we decided to make a homemade pizza using spices that we already had in our cabinet.
Ingredients
Prego Traditional Sauce
Spices (We used Tony's, oregano, garlic salt, parsley flakes and sage)
Shredded Mozzarella Cheese (American Heritage)
Toppings (We stuck to just pepperoni)
Olive Oil (not pictured)
Pre-Made Pizza Crust (Mama Mary's; not pictured)
Directions
1. Preheat the oven to 450 degrees F
2. Lightly brush the pre-made crust with olive oil
3. Place about half of the sauce that you want on your pizza onto the crust
4. Sprinkle the sauce with the desired amount of spices
5. Mix the spices into the sauce and put more sauce onto the pizza
6. Sprinkle the pizza with the desired amount of mozzarella cheese
7. Place toppings onto pizza as desired
8. Bake at 450 degrees for 8 to 10 minutes
9. Enjoy!
This post is for the #SummerBloggerChallenge. This week's prompt: Try a new recipe or create your own. This could be for food OR drink, or both! Take photos of the finished product of the food/drink you make, you could also include photos of the process. Talk about whether you liked the recipe you tried, OR if you're creating your own recipe, talk about why you chose to make it.

read more "
Gimme Pizza! P-I-Z-Z-A!
"
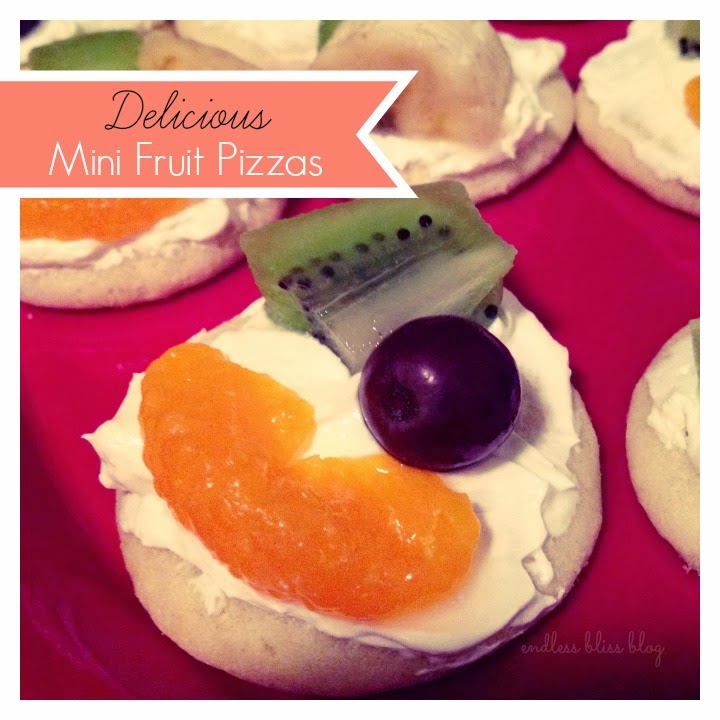
I've made these fruit pizzas twice, both for work, and both times, they were a hit! I love recipes that are simple and require very little money. If you're looking for a snack that's both sweet and healthy-ish, then these fruit pizzas are perfect. We ate them in the morning, but they would also be good for an afternoon snack or a tasty dessert.
Ingredients:
-- Pre-made sugar cookie dough
-- Cool Whip
-- 8 oz. cream cheese
-- Assorted fruit
Directions:
1. Bake the cookies as instructed. I made mine little mini cookies, but little things are so cute.
2. Mix together all of the cream cheese and about 3/4 of the Cool Whip to taste. You can use as little or as much as you'd like, but I'd recommend using at least half of the tub. I used my Ninja to mix the two ingredients together.
3. Cut fruit as desired. I used mandarin oranges, bananas, grapes and kiwi for this batch, but you can use whatever fruits you'd like. I wanted a variety of color.
4. After cookies are done baking and cooling, use a spoon to place a desired amount of the Cool Whip/cream cheese mixture on the cookies.
5. Place fruit on the cookies and Cool Whip/cream cheese mixture as desired.
6. Voila! Done!
It's super easy and super tasty. Enjoy!

read more "
Mini Fruit Pizza Recipe.
"
09
10